
Weirdly enough, there is no industrial solution to connect a OneWire Bus with a KNX Bus. So I made my own one. Thanks to the great work of the people in the KNX-Userforum and the authors of libraries like the KNX library, the OneWire library, the 2438 Library and tutorials like the ones from Hackatronics it was possible.
Basically to make a OneWire to KNX Bridge is not difficult, but it still took me a while to get the Arduino code right and to solve a couple of problems with providing power to 30 sensors and the pullup resistors. You don’t need to have to solve those problems, you can use this solution.
What you need:
- Siemens KNX Bus coupler
- Arduino Nano (ProMicro, Uno will probably also work, but minimal changes in code might be needed)
- DS18b20 OneWire sensors like these temperature sensors, or these temperature sensors.
- Angled header
- Some sort of cable/connector. But you can also just solder it directly to the arduino.
- 4.7kOhm resistor and others depending on how many sensors you use.
- Soldering Iron
- Voltmeter
Disclaimer: If you use the links above, I get a very small percentage from Amazon. Thank you for your support of future tutorials.
A OneWire to KNX Bridge – But why?
As you can see above, 1-Wire temperature sensors are very cheap, in fact more than 50 times cheaper than a KNX temperature sensor. So it makes sense in a house to have a KNX Bus AND a OneWire Bus in parallel, and use the OneWire Bus for cost effective temperature sensing. Theoretically you could use the two “spare wires” of the KNX Bus to run the 1-Wire Bus in parasitic mode, but I have not tested this and do not recommend it. If you already have cabling in place you can try it, but the amount of sensors per branch will probably be limited. I don’t know exactly.
I have a separate cable for OneWire, same spec like the KNX cable, and I have a long and convoluted network of about 30 sensors running perfectly. However I use 1-Wire hubs for this. The 5V needed for normal OneWire operation are provided by those hubs, not through the Arduino, which has its power from the KNX bus. More on this bellow.
Basic Considerations
Arduino power
The Arduino draws its power from the KNX bus coupler. The 5WG1 117-2AB12 bus couplers data sheet says it can deliver a maximum of 10mA on the 5V output. The Arduino nano can draw up to 20mA on its own, but somehow it works well with this coupler and many others have reported it works. Some even tested it up to 20mA with success. However, I recommend to be cautious.
1-Wire power & 1-Wire hub
I assume that you already know what OneWire is and that it normally needs three wires: GND, DATA and 5V. It is however possible to use only GND and DATA and Connect 5V of the sensor to GND. It then draws its power from the DATA line. It’s called “parasitic mode”.
If you use a lot of sensors you will need more power. On temperature update (which happens simultaneously for all sensors, once the arduino asks for it) each DS18B20 uses 1.5mA of current. For a network of more than 10 sensors that is 15mA and that is certainly too much for the bus coupler.
I have about 30 sensors and because of this I have always been using two OneWire hubs. These hubs don’t do anything fancy to the data line, I believe they more or less connect those together, maybe have some circuit to lower reflection problems or so. What they do however is to deliver power to the 5V line. This could probably also be done by any power supply, but I don’t know for sure.
1-Wire PullUp resistor and arduino
For OneWire to work with the arduino it needs a pull-up resistor from the DATA line to 5V. This is usually 4.7kOhm. In the case of a lot of sensors however, this is too high. It means, that once you connect the sensors the voltage of the DATA line falls. In my case with 30 sensors it fell to 4.3V. The Arduino could not read any data like this, and the bus coupler could certainly not provide enough power.
A 1k Ohm resistor would work, however it then would draw the power from the Arduinos 5V and therefore from the bus coupler making the problem even worse. So DON’T do this. In this case you need a separate power supply for the OneWire bus. In my case this is a hub. Maybe you could just use any power supply for the 5V Line of OneWire. I don’t know this, if you try and it works, let me know in the comments.
PullUp on arduino AND between 5V 1-Wire supply power and DATA
If you use a power supply for the OneWire bus you still need to have the normal 4.7kOhm resistor on the Arduino. But in addition to that you will need a PullUp resistor between DATA and 5V of the OneWire hub, respectively the OneWire 5V power supply and the DATA line.
The size of the resistor depends on the amount of sensors you have on the bus. It needs to be lower with more devices. In my case of 30 sensors and two hubs I have a 1kOhm resistor on one Output of each 1-Wire hub.
To find out the value you need, you simply measure the voltage of your DATA wire once you connected all your 1-Wire sensors. If it is 4.9 – 5V all is good. If it is lower than that use a smaller pull-up between the DATA line and the 1-Wire power supply 5V. Start with 4.7kOhm there too, and go lower until your DATA line reads 4.9V or more.
Steps:
- Disassemble the bus-coupler.
- Solder 4 wires to the angled header in order to connect to the bus coupler.
- If you want: Hot-glue angled header to bus coupler to make sure it can’t fall off.
- Solder 4 wires to the arduino (Don’t do this if you hot glued the angled header to the buscoupler)
- If you want (and used the got-glue): use connector cable instead of direct wire.
- Solder 2/3 wires for OneWire to the arduino.
- Solder pull-up resistor to the arduino.
- Edit Arduino Code to your specifications.
- Programm arduino (Buscoupler MUST NOT be connected, while programming)
Connections for the OneWire to KNX Bridge
Bus coupler to Arduino
Thanks to this tutorial connecting is simple :
If you have a 5V arduino connect like this:
</tr border=”1″ cellpadding=”10″>
| Arduino | Bus coupler |
|---|---|
| GND | GND (PIN 1) |
| VCC/5V | 5V VCC (PIN 5) |
| RX | TX (PIN 4) |
| TX | RX (PIN 2) |
If you have a 3.3V arduino connect like bellow.
(This is for general KNX operation possible, but maybe problematic for this 1-Wire bridge)
| Arduino | Bus coupler |
|---|---|
| GND | GND (PIN 1) |
| RAW | 5V VCC (PIN 5) |
| RX | TX (PIN 4) |
| TX | RX (PIN 2) |
I used an angled header to plug into the bus coupler. Its a bit of a hack, but it saves space and I later hot glued it in place. It doesn’t look pretty, but it works and is secure.

This is how to connect the Buscoupler to the Arduino
Pull-Up resistor
The pull-up (a very normal resistor, which is just called like this because of it’s function) goes between 5V and DATA.
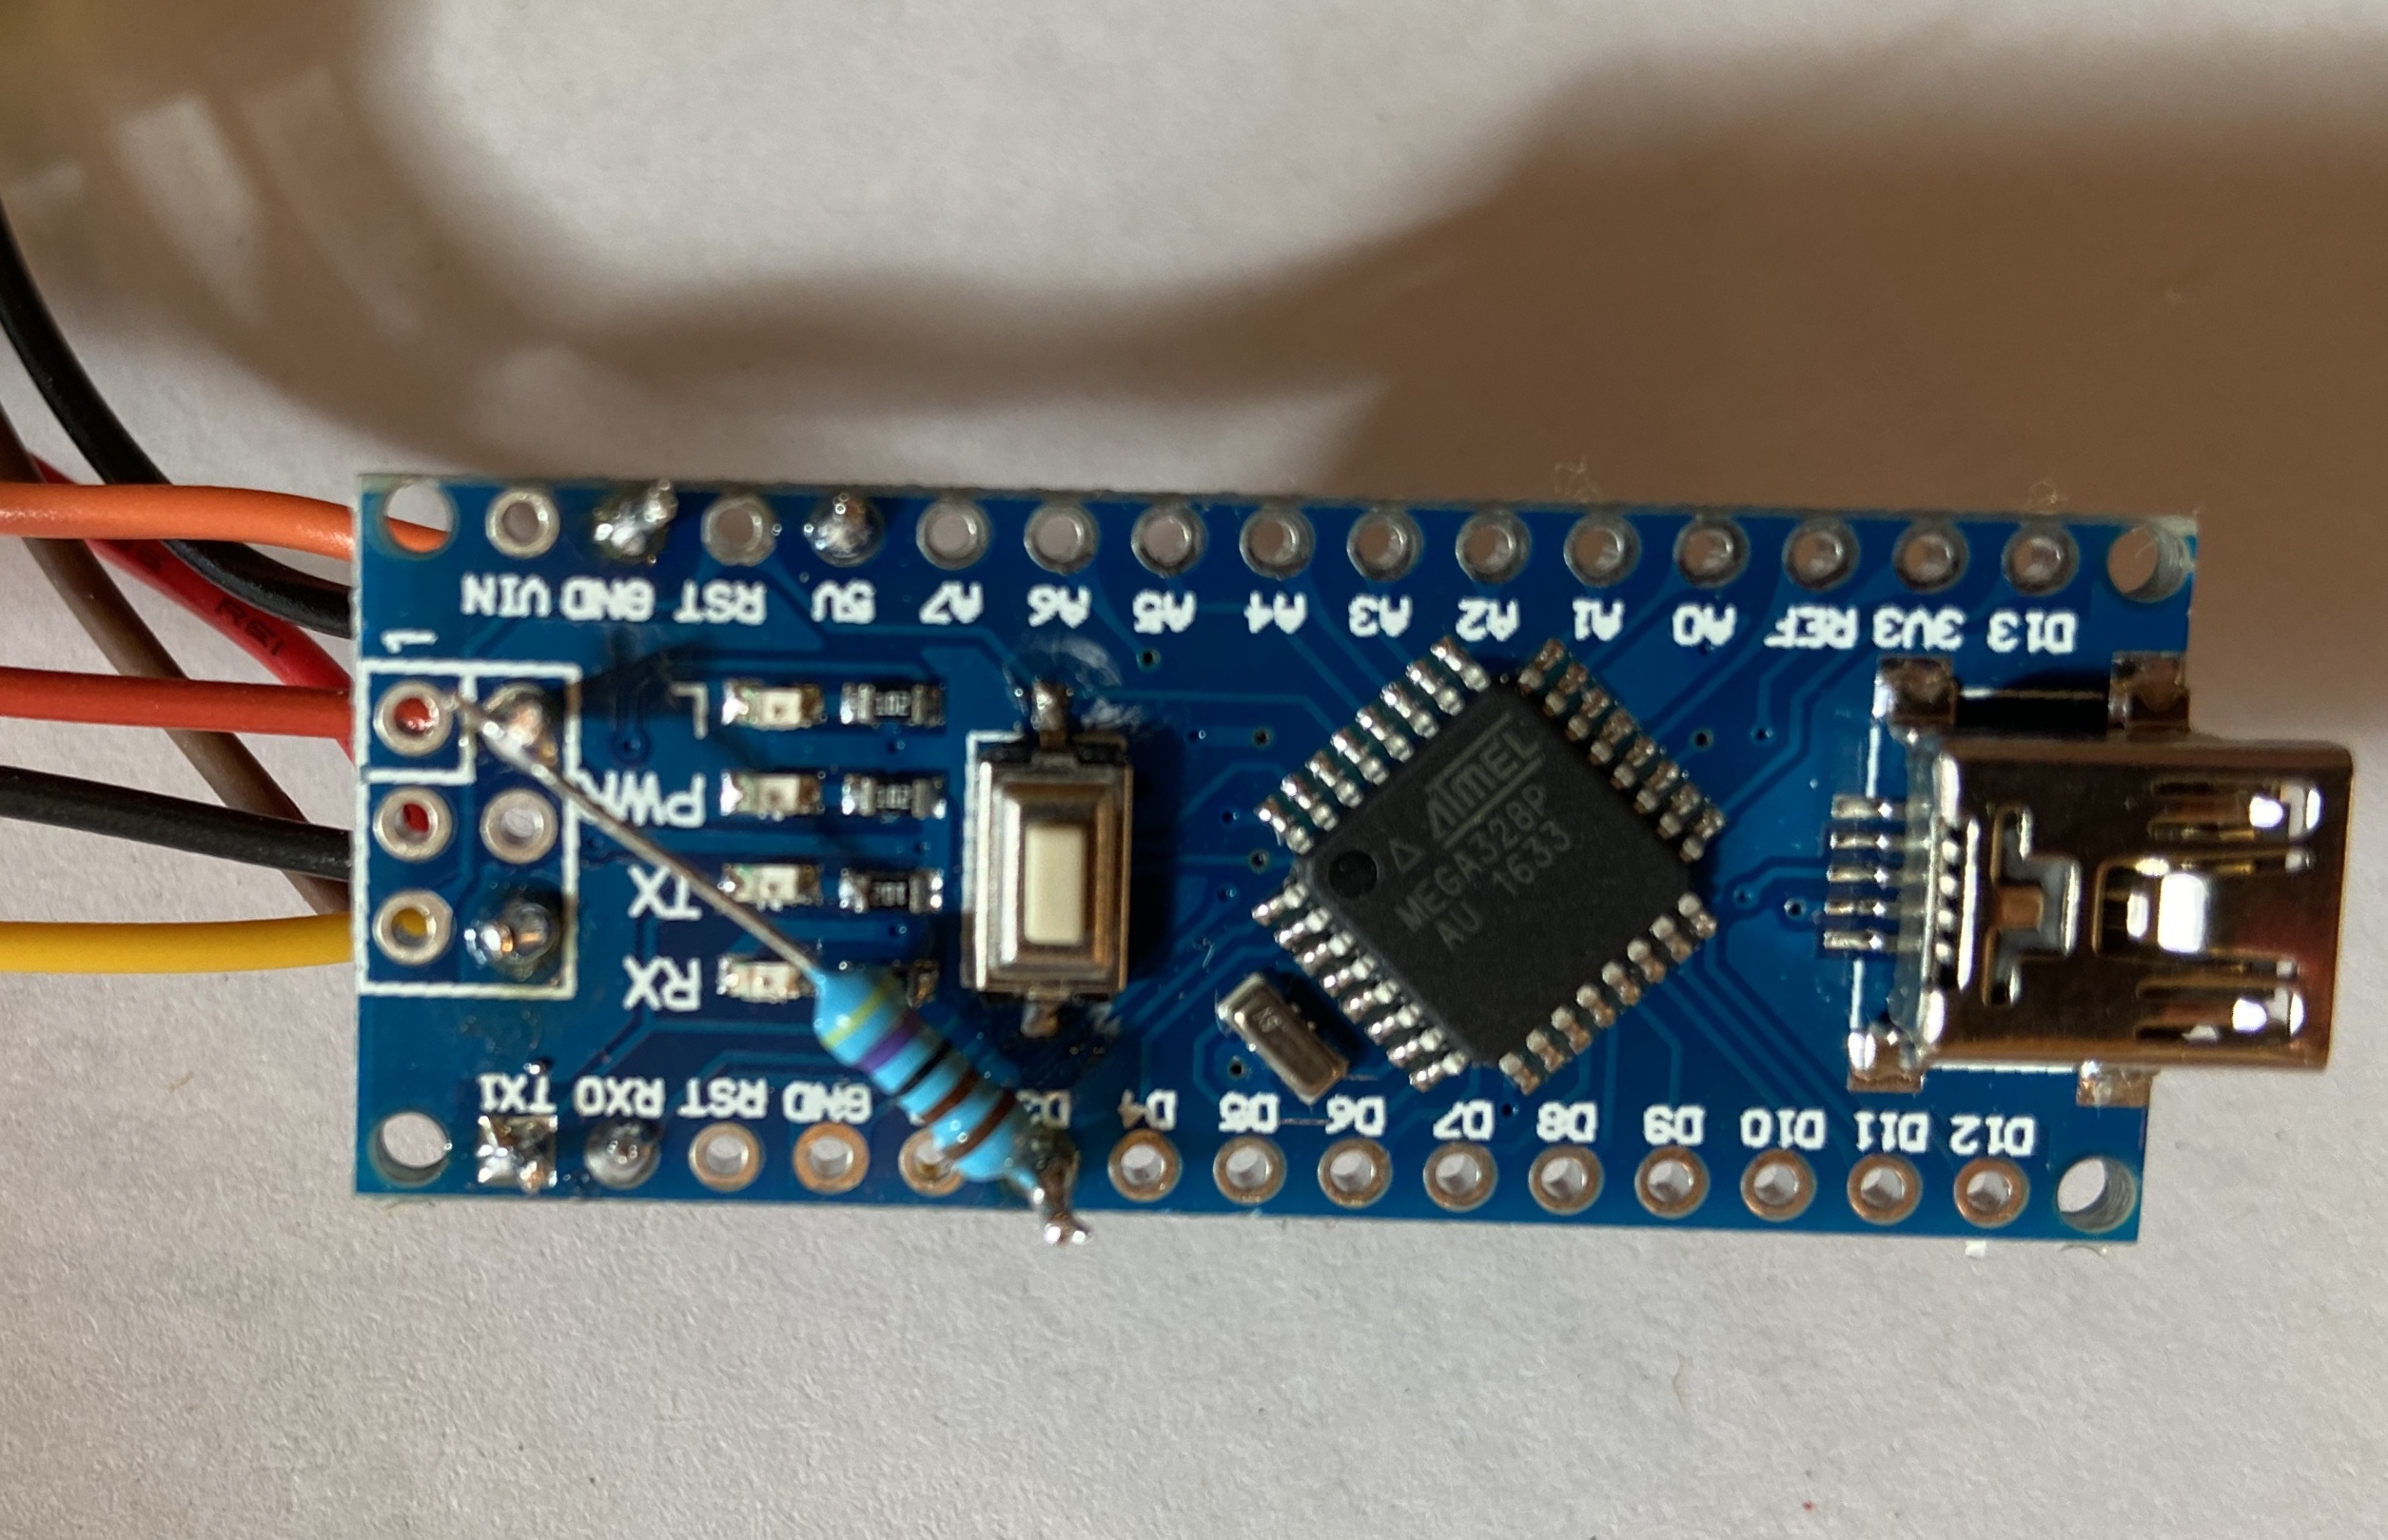
Arduino pull-up resistor between 5V and Pin 3 for 1-Wire operation.
Make sure it doesn’t touch anywhere it shouldn’t and also will not if a little pressure is applied by accident.
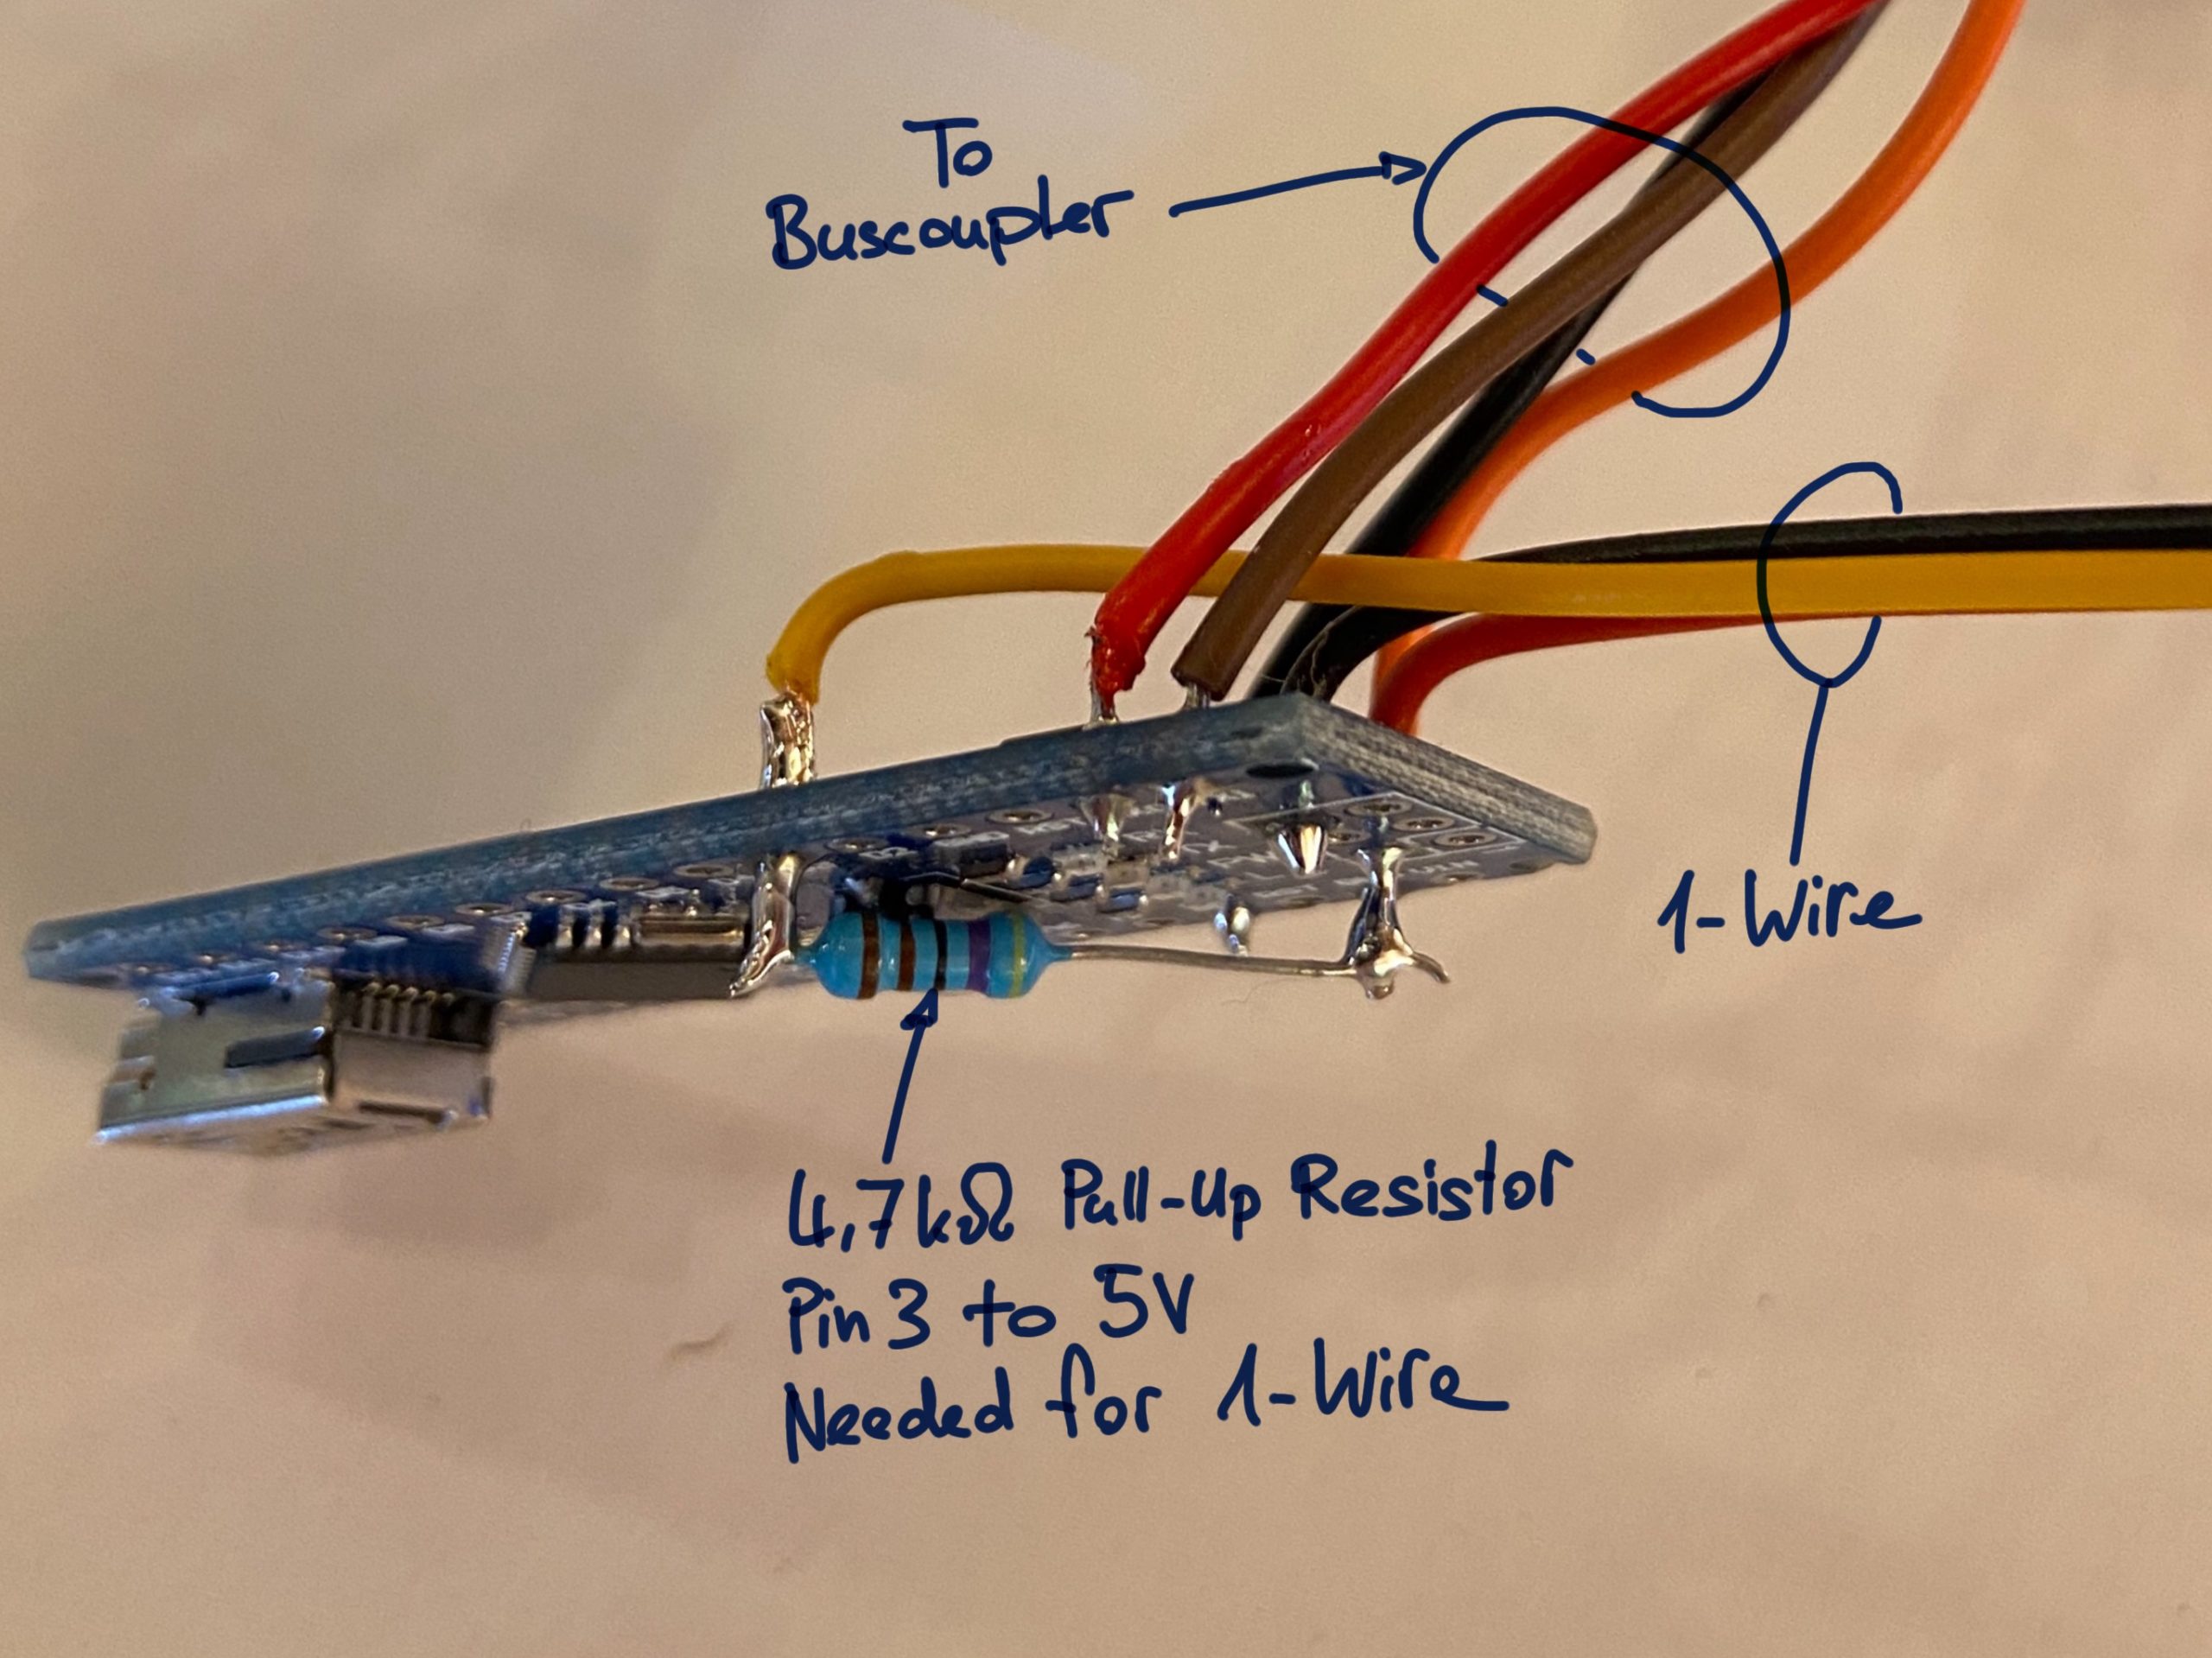
Everything that goes on with the Arduino in one picture. Wires to KNX bus coupler, to 1-Wire and the PullUp resistor.
After programming the Arduino you can fit it together with the bus coupler into the case. You only need the 5V line from the Arduino to OneWire, if you don’t have a separate power supply for it. So as you can see I removed this cable after testing.
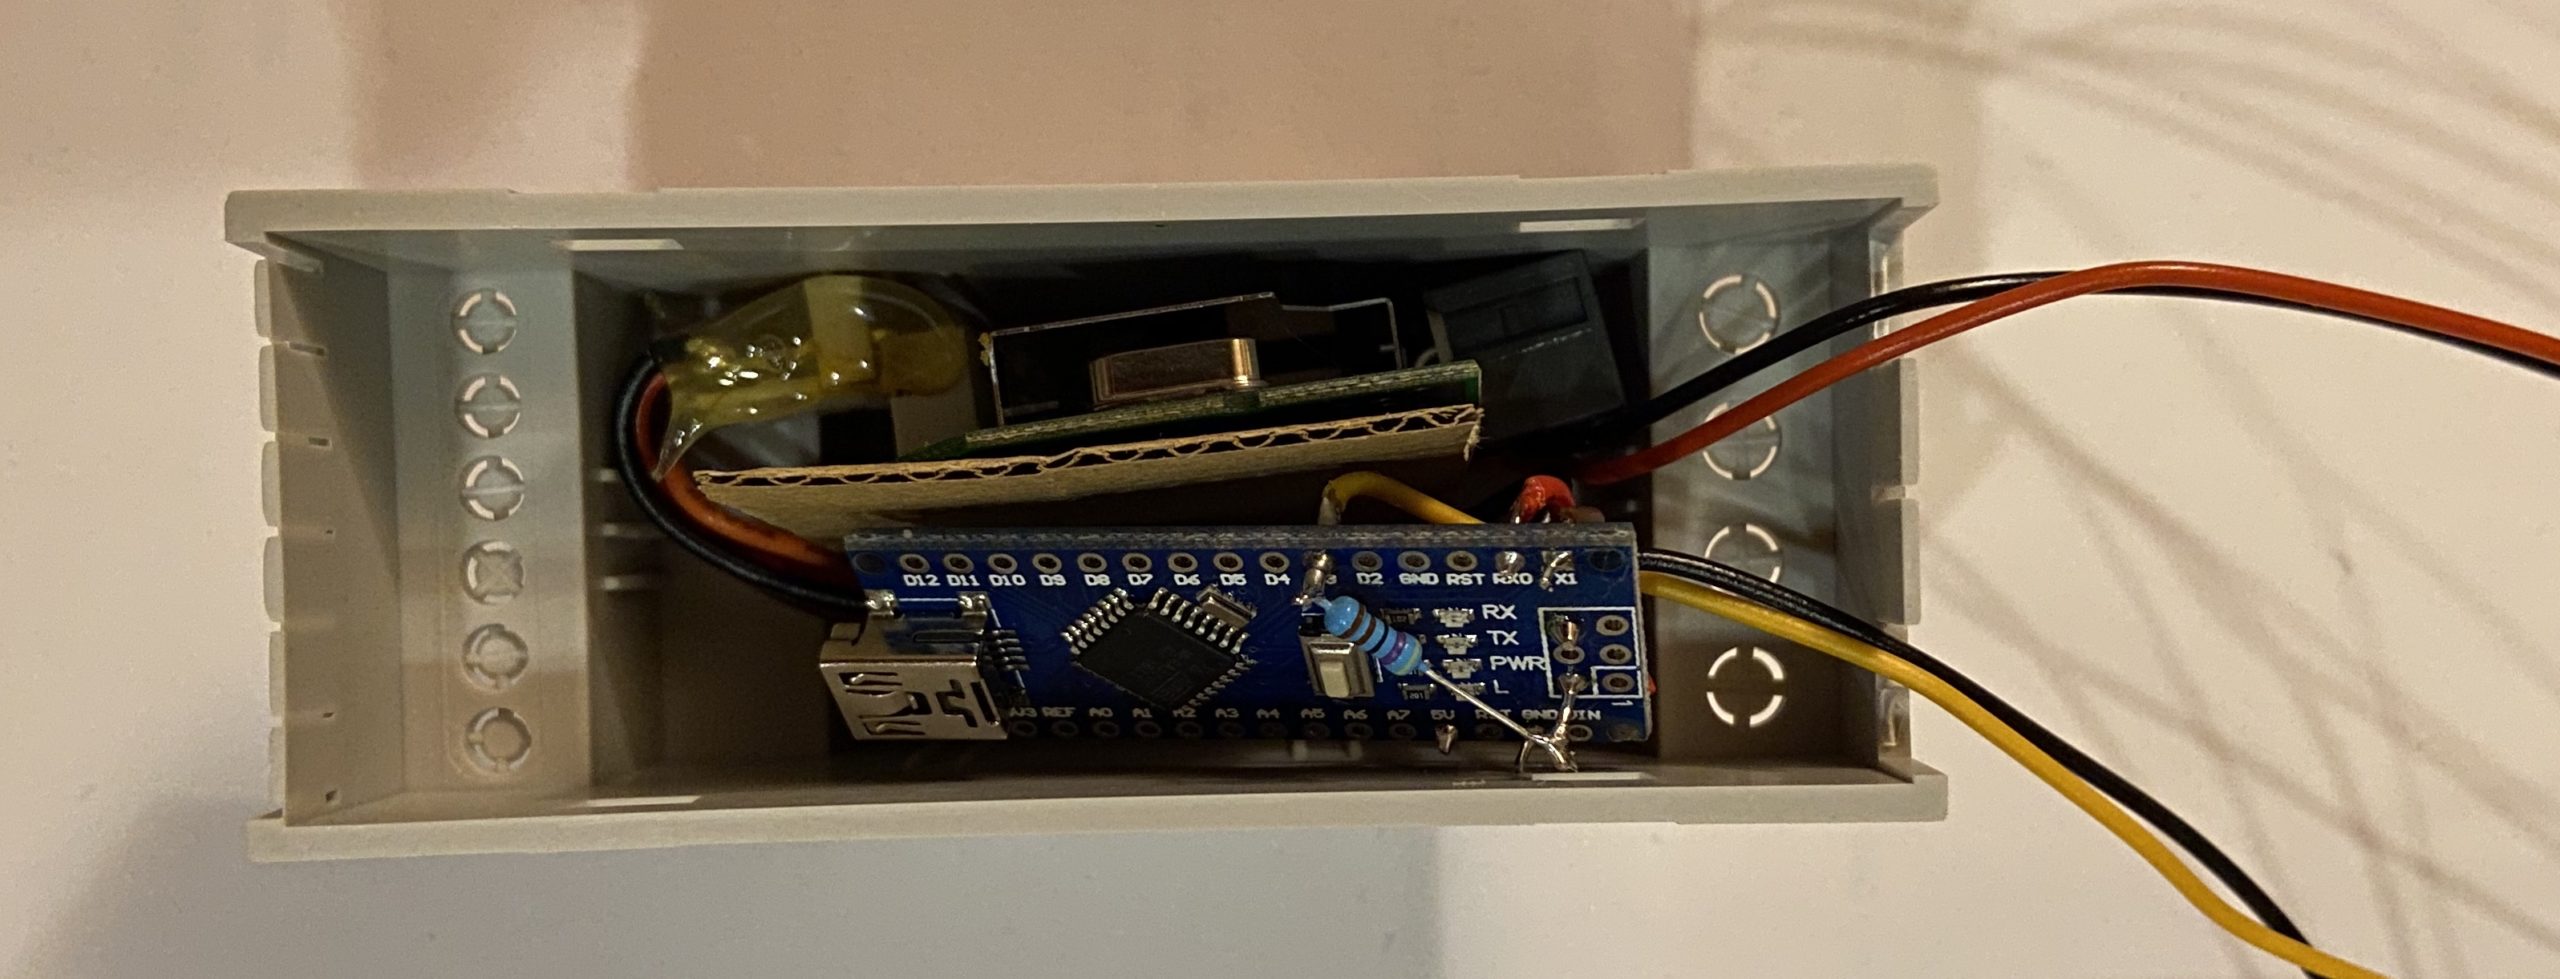
Arduino and KNX bus coupler both fitted into a 2 unit din case. Separated with a bit of cardboard to avoid any shorts.
And install it.

Left the 1-wire hub. Right the finished OneWire to KNX Bridge
To be honest I can not recommend the hubs I have. I’m not sure how much they really do. Support of the company is rather slow and has not been very helpful to me in the past. Also their products seem overpriced to me.
Software
Other people have done amazing work with the libraries and tutorials. This OneWire to KNX Bridge is only possible thanks to them and I am very grateful for that. In this case the people in the KNX-Userforum and the authors of libraries like the KNX library, the OneWire library and tutorials like the ones from Hackatronics.
Edit the software to your needs – these are the steps:
- Get the OneWire addresses of your sensors in the appropriate format (tutorial and code bellow).
- Put the OneWire addresses of your sensors into the code and name the addresses appropriately.
- Edit the variable definitions for example “float Troom” as to your needs. You need as many variables as you measure values.
- Edit the constants as to your needs. There are two loops in the code. One for OneWire Sensors that require only few updates and one for Sensors that require quicker updates. You can set the time for both loops. Also sensor data will only be sent to KNX if there was a change of a certain size. This size can be set in the constants section of the code.
- Edit the names of the special DS2438 sensors addresses, in case you use some of those. (DS2438 xxxxx2438(&oneWire, xxxxx);
- Edit the names of the DS2438 addresses to the ones set in 5, in the void setup section. (xxxxx2438.begin)
- Edit the names of the sensors in the sensor resolution section.
- In the void loop sectopn in the appropriate loop (slow or quick updater) add one line for each temperature sensor with the variable set above , the KNX address they should send to and the variable for the device address: TRoom1 = writeTemperature(TRoom1, “2/7/8”, ATRoom1);
- If you use humidity sensors do the same with those. See comments in the code to know how.
The Code
//  This Arduino sketch reads DS18B20 "1-Wire" and 2438 based humidity sensors with HIH-4021,
//  and sends them to KNX.
//
//  2020 by Raphael Huber
//
//  Tutorials and libraries:
//  http://www.hacktronics.com/Tutorials/arduino-1-wire-tutorial.html
//  OneWire Address finder https://www.hacktronics.com/Tutorials/arduino-1-wire-address-finder.html
//  OneWire Library: https://www.arduinolibraries.info/libraries/one-wire
//  Library for temperature sensors: https://github.com/milesburton/Arduino-Temperature-Control-Library
//  Library for humidity sensors: https://github.com/jbechter/arduino-onewire-DS2438
//  KNX Library: https://bitbucket.org/thorstengehrig/arduino-tpuart-knx-user-forum/src/default/
//  THE Discussion about OneWire and KNX with Arudino: https://knx-user-forum.de/forum/öffentlicher-bereich/knx-eib-forum/diy-do-it-yourself/33016-arduino-am-knx
//  KNX Arduino, quick tutorial: http://www.intranet-of-things.com/smarthome/infrastructure/knx/arduino/


#include <OneWire.h>
#include <DallasTemperature.h>
#include <KnxTpUart.h>
#include <DS2438.h> // Only needed for humidity sensors.


// Data wire is plugged into pin 3 on the Arduino
// #define ONE_WIRE_BUSA 4 // Multiple instances could be generated
#define ONE_WIRE_BUS 3

// Set the KNX GroupAddress of ARDUINO
KnxTpUart knx(&Serial, "5.0.30");

// Setup a oneWire instance to communicate with any OneWire devices
// Note: You can also setup multiple instances to read OneWire from multiple PINs
// OneWire oneWireA(ONE_WIRE_BUSA);
// OneWire oneWireB(ONE_WIRE_BUSB);

OneWire oneWire(ONE_WIRE_BUS);

// Pass our oneWire reference to Dallas Temperature.
// In case of multiple OneWire instances it would look like so:
// DallasTemperature sensorsA(&oneWireA);
// DallasTemperature sensorsB(&oneWireB);

DallasTemperature sensors(&oneWire);

// Assign the unique addresses of your 1-Wire temp sensors.
// See the tutorial on how to obtain these addresses:
// http://www.hacktronics.com/Tutorials/arduino-1-wire-address-finder.html

DeviceAddress ATRoom1 = {0x28, 0x48, 0x56, 0x3A, 0x06, 0x00, 0x00, 0x41 };
DeviceAddress ATRoom2 = {0x28, 0x68, 0xA9, 0x39, 0x06, 0x00, 0x00, 0xB6 };
DeviceAddress ATRoom3 = {0x28, 0xEC, 0xB1, 0x3A, 0x06, 0x00, 0x00, 0x4A };
DeviceAddress ATRoom4 = {0x28, 0xBC, 0x23, 0x1B, 0x05, 0x00, 0x00, 0x4B };
DeviceAddress AHRoom1 = {0x26, 0xE8, 0x8F, 0x87, 0x01, 0x00, 0x00, 0xB9 };
DeviceAddress AHRoom2 = {0x28, 0xB2, 0x28, 0x1B, 0x05, 0x00, 0x00, 0x28 };

// You need one variable per sensor
float TRoom1;
float TRoom2;
float TRoom3;
float TRoom4;
float HRoom1;
float HRoom2;

// needed for loops
int count;
unsigned long previousMillisOWKNXquick = 0; // needed for loops
unsigned long previousMillisOWKNX = 0;

// constants, adapt to your need:
const int OneWireRefreshQuick = 30;     // OneWire refresh intervall in seconds for quick updaters
const int OneWireRefresh = 2;          // OneWire refresh intervall in minutes for slow updaters
const int AlwaysRefresh = 10;             // Every 10 refreshes, write all values even if they didn't change. To avoid long gaps in in unchanged data
const int KNXDelay = 125;               // Delay between sending KNX telegrams in milliseconds to avoid bus overload
const float MinimalDifference = 0.15;     // Minimal Difference between two measured temperature values to make it worth writing to KNX
const float MinimalDifferenceH = 4;     // Minimal Difference For Humidity measurements


// Somehow the SD2438 library needs this (special address format?) to get the data.
// oneWireA / oneWireB - In case of using multiple pins - depending which pins your sensors are connected to


DS2438 AHRoom12438(&oneWire, AHRoom1);
DS2438 AHRoom22438(&oneWire, AHRoom2);

void setup(void)
{
  // start serial port
  // Serial.begin(9600);

  // KNX initialize
  Serial.begin(19200, SERIAL_8E1);
  knx.uartReset();

  // Start up the library
  sensors.begin();
  sensors.setWaitForConversion(true);

  // For multiple OneWire instances on multiple pins it would instead require:
  // sensorsA.begin();
  // sensorsA.setWaitForConversion(true);
  // sensorsB.begin();
  // sensorsB.setWaitForConversion(true);

  //For some reason, each 2438 Sensor needs to be started
  AHRoom12438.begin();
  AHRoom22438.begin();

  // set the resolution to 11 bit (tenths of degrees)
  // sensorsA / sensorsB - In case of using multiple pins - depending which pins your sensors are connected to

  sensors.setResolution(ATRoom1, 11);
  sensors.setResolution(ATRoom2, 11);
  sensors.setResolution(ATRoom3, 11);
  sensors.setResolution(ATRoom4, 11);

}

void loop(void)
{

  // OneWire Read and KNX Write routine
  //----------------------------------------------------------------------

  // Prepare the Quick OneWire Read and KNX Write Loop.
  unsigned long currentMillisOWKNXquick = millis();

  if (currentMillisOWKNXquick - previousMillisOWKNXquick >= OneWireRefreshQuick * 1000) {

    // save the last time OneWireQuickRoutine was started
    previousMillisOWKNXquick = currentMillisOWKNXquick;


    // Get OneWire Data and write it to KNX for the quick updaters
    //----------------------------------------------------------------------
    // serial.print("Getting temperatures...\n\r");
    sensors.requestTemperatures();

    // Just add as many as you have sensors. But first add DeviceAddresses and variables above.
    // For backup you can also add multiple sensors to one KNX address IF only one sensor is connected.
    // It will only write to KNX IF the sensor is present and can be read properly.
    // Fill in your KNX addresses
    // The format for the writeTemperature function is: (Last measurement, KNXAddress, DeviceAddress)
    // The Output is the new measurement and of course the KNX output.

    TRoom1 = writeTemperature(TRoom1, "2/7/8", ATRoom1);
    TRoom2 = writeTemperature(TRoom2, "2/7/9", ATRoom1);


    // Counter handling
    if (count == AlwaysRefresh) {
      count = 0;
    }
    else {
      count = count + 1;
    }
  }

  // Prepare the Slow OneWire Read and KNX Write Loop.
  unsigned long currentMillisOWKNX = millis();

  if (currentMillisOWKNX - previousMillisOWKNX >= OneWireRefresh * 60000) {

    // save the last time OneWireSlowRoutine was started
    previousMillisOWKNX = currentMillisOWKNX;


    // Get OneWire Data and write it to KNX for the quick updaters
    //----------------------------------------------------------------------
    // serial.print("Getting temperatures...\n\r");
    sensors.requestTemperatures();

    TRoom3 = writeTemperature(TRoom3, "2/7/5", ATRoom3);
    TRoom4 = writeTemperature(TRoom4, "2/7/6", ATRoom4);


    // Reading Humidity - KNX Addresses in this order: RelativeHumidity, AbsoluteHumidity, DewPoint
    // This is memory intensive and will not work if dynamic memory of Arduino is used more than 58%.
    // In case of memory problems KNX address will be jumbled up and it writes to wrong KNX addresses
    // You need at least 820 bytes FREE dynamic memory

    HRoom1 = WriteHumidity(HRoom1, AHRoom12438, "2/6/10", "2/6/1", "2/6/24");
    HRoom2 = WriteHumidity(HRoom2, AHRoom22438, "2/6/14", "2/6/17", "2/6/23");


  }

}

// Temperature Reading Function
//----------------------------------------------------------------------


float writeTemperature(float temp, String KNXaddress, DeviceAddress OWAddress) {
  float dummy = temp;
  temp = sensors.getTempC(OWAddress);
  if (temp != DEVICE_DISCONNECTED_C && (temp - dummy > MinimalDifference || dummy - temp > MinimalDifference)) {
    knx.groupWrite2ByteFloat(KNXaddress, temp);
    delay(KNXDelay); // Write to KNX if sensor not disconnected, Limit max KNX writes per sec

    // serial.print(KNXaddress);
    // serial.print(" is: ");
    // serial.print("C: "); // For testing only, comment out when it works
    // serial.println(temp); // For testing only, comment out when it works

  }

  // Write KNX if sensor is not disconnected and it is the "AlwaysRefresh" number of refreshes.

  else if (temp != DEVICE_DISCONNECTED_C && count == AlwaysRefresh) {
    knx.groupWrite2ByteFloat(KNXaddress, temp);
    delay(KNXDelay); // Write to KNX if sensor not disconnected, Limit max KNX writes per sec

    // serial.print(KNXaddress);
    // serial.print(" is: ");
    // serial.print("C: "); // For testing only, comment out when it works
    // serial.println(temp); // For testing only, comment out when it works
  }

  else {
    temp = dummy;
  }
  return temp;
}


// Humidity Reading Function for HIH-4021 sensors with DS2438. Other sensors will require changes in calculation
//----------------------------------------------------------------------

float WriteHumidity(float RelHum, DS2438 OWAddressH, String KNXAddressH, String KNXAddressAbs, String KNXAddressDP) {

  float dummy = RelHum; // dummy to check if its worth writing value to KNX

  // Read Sensor

  OWAddressH.update();

  delay(750);

  if (OWAddressH.isError() || OWAddressH.getVoltage(DS2438_CHA) == 0.0) {
    // serial.print("\n Error Reading Humidity = ");// For testing only, comment out when it works
  }
  else {
    float Temp2438 = OWAddressH.getTemperature();
    // Read VCC and Voltage from Humidity, divide, do some math to get humidity from HIH-4021. Calculations depend on sensor.
    float rh = (OWAddressH.getVoltage(DS2438_CHA) / OWAddressH.getVoltage(DS2438_CHB) - 0.16) / 0.0062;
    RelHum = (float)(rh / (1.0546 - 0.00216 * Temp2438));

    if (RelHum < 0.0) {
      RelHum = 0.0;
    }

    else if (RelHum > 100.0) {
      RelHum = 100.0;
    }

    float Temp2438K = Temp2438 + 273.15;
    float DewPoint = Temp2438K / ((-0.0001846 * log(RelHum / 100.0) * Temp2438K) + 1.0) - 273.15;
    float AbsHum = (RelHum * 6.112 * exp((17.67 * Temp2438) / (243.12 + Temp2438)) * 2.1674) / Temp2438K;

    if (RelHum - dummy > MinimalDifferenceH || dummy - RelHum > MinimalDifferenceH) {

      // Send calculated values to KNX not more than x times a second
      delay(KNXDelay);
      knx.groupWrite2ByteFloat(KNXAddressH, RelHum);
      delay(KNXDelay);
      knx.groupWrite2ByteFloat(KNXAddressAbs, AbsHum);
      delay(KNXDelay);
      knx.groupWrite2ByteFloat(KNXAddressDP, DewPoint);

      // Serial Print For testing only, comment out when it works
      // serial.print("\n Temperature = ");
      // serial.print(Temp2438, 1);
      // serial.print("C, Relative Humidity = ");
      // serial.print(RelHum, 1);
      // serial.print("%, DewPoint = ");
      // serial.print(DewPoint, 0);
      // serial.print("C, Absolute Humidity = ");
      // serial.print(AbsHum, 1);
      // serial.print("g/m3.");

    }

    else if (count == AlwaysRefresh) {
      // Send calculated values to KNX not more than x times a second
      delay(KNXDelay);
      knx.groupWrite2ByteFloat(KNXAddressH, RelHum);
      delay(KNXDelay);
      knx.groupWrite2ByteFloat(KNXAddressAbs, AbsHum);
      delay(KNXDelay);
      knx.groupWrite2ByteFloat(KNXAddressDP, DewPoint);

    }
    else {
      RelHum = dummy;
    }
  }

  return RelHum;
}
OneWire device addresses
You will find, that within the software everything is commented and you really don’t need to change much, only whats described above. But one thing you need to change are the device addresses of the OneWire sensors. And for that you first need to know them and get them in the right format.
Use this tutorial and code to obtain the device addresses of your OneWire sensors.
// This sketch looks for 1-wire devices and
// prints their addresses (serial number) to
// the UART, in a format that is useful in Arduino sketches
// Tutorial:
// http://www.hacktronics.com/Tutorials/arduino-1-wire-address-finder.html

#include <OneWire.h>

OneWire  ds(3);  // Connect your 1-wire device to pin 3

void setup(void) {
  Serial.begin(9600);
  discoverOneWireDevices();
}

void discoverOneWireDevices(void) {
  byte i;
  byte present = 0;
  byte data[12];
  byte addr[8];

  Serial.print("Looking for 1-Wire devices...\n\r");
  while(ds.search(addr)) {
    Serial.print("\n\rFound \'1-Wire\' device with address:\n\r");
    for( i = 0; i < 8; i++) {
      Serial.print("0x");
      if (addr[i] < 16) {
        Serial.print('0');
      }
      Serial.print(addr[i], HEX);
      if (i < 7) {
        Serial.print(", ");
      }
    }
    if ( OneWire::crc8( addr, 7) != addr[7]) {
        Serial.print("CRC is not valid!\n");
        return;
    }
  }
  Serial.print("\n\r\n\rThat's it.\r\n");
  ds.reset_search();
  return;
}

void loop(void) {
  // nothing to see here
}
For this you need to connect the Arduino to the sensors as described in the tutorial. You will then obtain device addresses in this format: ” 0x28, 0x48, 0x56, 0x3A, 0x06, 0x00, 0x00, 0x41″
These you can then insert into the code for the OneWire to KNX Bridge.

Hi,
thanks for developing all of this. I got my system according to your instructions now up and running.
Arduino Nano with 15 1Wire temperature sensors and a few other sensors and a display directly on the Arduino. In between the BUS coupler and the Arduino I installed a ADUM.
For supplying the 1Wire with 15 sensors the Arduino cannot be used anymore as described here. The simple solution for me was a 5V REG power supply which is not only powering the 1Wire but also the Aduino at the same time (no other power source used on the entire system. The Pull-Up Resistor is basically installed on the power supply side in between 5V and Data. For my 15 sensors I believe that I have currently a 1kOhm in use. The 5V, GND from the supply and the pulled-up Data then simply get connected to the Arduino. A second pull-up on the Arduino was not required in my setup.
Thank you for your valuable insights!
This works very well and is also very cheap. Is there also a way to write the temperature from the DS2438 to the KNX bus? Or do you need a separate sensor for that? Many Thanks
greeting
Thorsten
So far I have only read humidity from 2438 sensors. But I reading temperature should be possible too. Maybe look at the original library: https://github.com/jbechter/arduino-onewire-DS2438
There is an example for temperature and voltage reading.
Hello.
Can anyone send me a link for KNX Library?
Without it I will not be able to make sensors for 1-wire to KNX.
I’ve searched everywhere but I can’t find it.
My e-mail jaxkax450@gmail.com
Thanks
Hi, thank you for stepping by!
The links were broken, thank you for pointing this out.
I updated the links in the post, the library was moved to github.
https://github.com/thorsten-gehrig/arduino-tpuart-knx-user-forum
If you google “KNX arduino library” you find also other libraries.